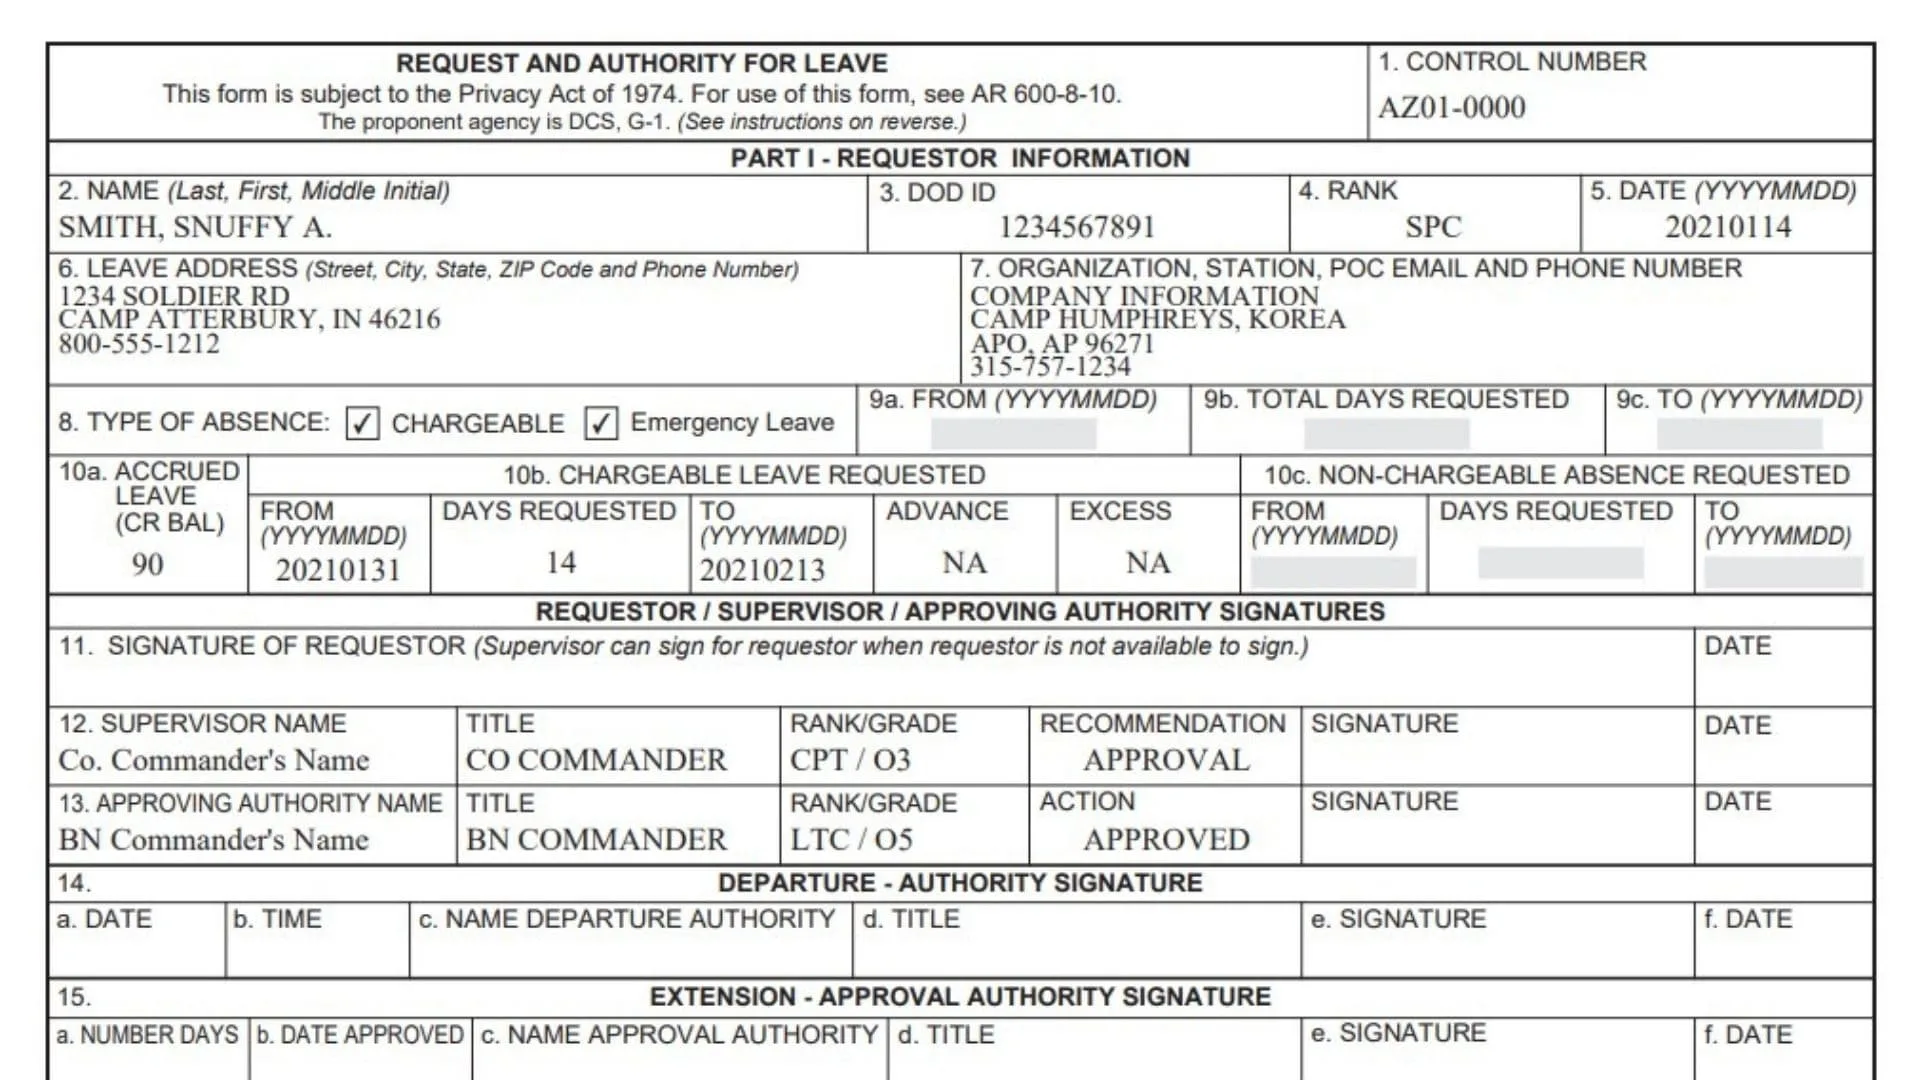
DA Form 31, also known as the Request and Authority for Leave form, is the official document used by members of the United States Army to request leave or authorized absences from duty. This form plays a critical role in managing military personnel schedules, ensuring accountability, and documenting time away from assigned duties. Whether a service member is requesting ordinary leave, emergency leave, or another type of authorized absence, DA Form 31 serves as both a request and an approval record that moves through the chain of command. It includes personal identification details, leave dates, type of absence, and authorization signatures from supervisors and approving authorities. Understanding how to properly complete DA Form 31 is essential for avoiding delays, ensuring compliance with Army regulations, and making sure leave is properly recorded and approved.
How To File DA Form 31
Filing DA Form 31 involves completing all required sections accurately and submitting it through your chain of command for approval. Start by filling in your personal and unit information, then clearly indicate the type of leave and the dates requested. Once completed, the form must be signed by you, reviewed by your supervisor, and approved by the appropriate authority. After approval, it becomes an official record of your authorized absence. Always ensure that your information is accurate and that all required signatures are obtained before your leave begins.

How To Complete DA Form 31 – Line By Line Instructions
Line 1 (Control Number): Enter the control number assigned by your unit, if applicable. This is often used for internal tracking.
Line 2 (Name): Write your full name in the format last name, first name, and middle initial.
Line 3 (DOD ID): Provide your Department of Defense identification number accurately.
Line 4 (Rank): Enter your current rank or grade.
Line 5 (Date): Fill in the date you are submitting the form using the required format.
Line 6 (Leave Address): Enter the full address where you will stay during your leave, including a phone number where you can be reached.
Line 7 (Organization, Station, POC Email And Phone Number): Provide your unit information, duty station, and a point of contact with email and phone number.
Line 8 (Type Of Absence): Select the appropriate type of leave, such as chargeable or non chargeable, based on your situation.
Line 9a (From Date): Enter the starting date of your leave period.
Line 9b (Total Days Requested): Indicate the total number of leave days you are requesting.
Line 9c (To Date): Enter the final date of your leave.
Line 10a (Accrued Leave): Record the number of leave days you have available.
Line 10b (Chargeable Leave Requested): Enter how many days will be deducted from your leave balance.
Line 10c (Non Chargeable Absence Requested): If applicable, list the number of days that are not deducted from your leave balance.
Line 11 (Signature Of Requestor): Sign the form to confirm that all information is correct. If unavailable, a supervisor may sign on your behalf.
Line 12 (Supervisor Name And Details): Your supervisor fills in their name, rank, title, and recommendation regarding your leave request.
Line 13 (Approving Authority): The designated authority enters their name, rank, decision, and signature to approve or disapprove the request.
Line 14a (Departure Date): Enter the date you will officially begin your leave.
Line 14b (Departure Time): Record the time you will depart.
Line 14c (Departure Authority Name): The name of the person authorizing your departure is entered here.
Line 14d (Departure Authority Title): Enter the official title of the departure authority.
Line 14e (Departure Signature): The departure authority signs to confirm authorization.
Line 14f (Departure Date Signed): Record the date the departure authority signs.
Line 15 (Extension Approval): If your leave is extended, record the number of additional days, approval date, and signature.
Line 16a (Return Date): Enter the date you return from leave.
Line 16b (Return Time): Record the time of your return.
Line 16c (Return Authority Name): Enter the name of the person verifying your return.
Line 16d (Return Authority Title): Provide the title of the return authority.
Line 16e (Return Signature): The authority signs to confirm your return.
Line 16f (Return Date Signed): Record the date this section is signed.
Line 17 (Remarks): Include any additional information relevant to your leave, such as contact details or special circumstances.
Line 18 (Travel Authorization Statement): This section outlines official travel authorization instructions. No entry is required from the requestor.
Line 19 (Return Transportation): This section provides travel contact details. No input is required.
Line 20 (Departed Unit): Enter the date you departed your unit if required.
Line 21 (Arrived APOD): Record the date you arrived at the aerial port of debarkation if applicable.
Line 22 (Arrived APOE): Enter the date of arrival at the aerial port of embarkation for return travel.
Line 23 (Arrived Home Unit): Record the date you returned to your home unit.
Line 24 (Additional Travel Info): Fill in any additional required travel details if applicable.
Line 25 (Dependent Information): List dependent names, relationships, and dates of birth if travel authorization includes dependents.
Line 26 (Headquarters Location): Enter the designation and location of the headquarters issuing the authorization.
Line 27 (Accounting Citation): Provide the financial accounting information related to the travel or leave.
Line 28 (Date Issued): Record the date the travel authorization was issued.
Line 29 (Travel Order Number): Enter the assigned travel order number.
Line 30 (Order Authorizing Official): The authorizing official provides their name, title, signature, and date.