Knowing how to view timesheets in QuickBooks Online is essential for business owners, accountants, payroll managers, and employees who need to monitor working hours accurately. QuickBooks Online provides built-in time-tracking tools that help businesses review employee hours, contractor time entries, customer-related work, and weekly timesheets from one place. Whether you want to check an employee’s daily attendance, review weekly working hours, verify billable time, or prepare information for payroll, the platform provides several ways to access these records. You can organize timesheets by date, customer, employee, contractor, or all team members, depending on your needs and available features. You can also open individual records to review their details, check approval status, and view timesheet history. Although the interface may look slightly different depending on your subscription and account settings, the main process is straightforward. Once you know where to find the Time Entries section, reviewing your team’s recorded hours becomes much simpler.
1. Open The Time Entries Section
The first step is finding the timesheet area inside your QuickBooks Online account.
Follow these steps:
- Sign in to your QuickBooks Online account.
- Open All Apps from the navigation menu.
- Select Time.
- Choose Time Entries.
- You will see the available time records for your team.
This section allows you to review recorded working hours and access individual timesheet information.
If you cannot find the Time option, check your subscription, user permissions, and time-tracking setup.
2. View Timesheets By Date
Viewing timesheets by date is useful when checking daily attendance or reviewing hours for a particular week or month.
To do this:
- Open All Apps > Time > Time Entries.
- Find the Display By dropdown menu.
- Select Date.
- Open the Date Range dropdown.
- Choose a predefined period or select Custom.
- Search for a specific team member if needed.
QuickBooks will display the time entries recorded within your selected period.
This option is particularly helpful when preparing payroll information or checking whether employees have entered their working hours correctly.
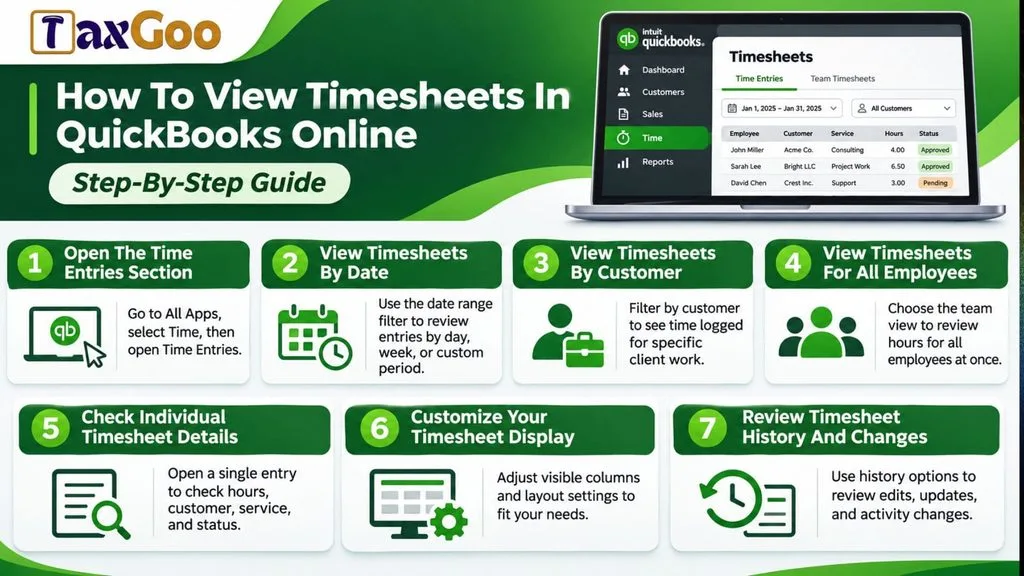
3. View Timesheets By Customer
Businesses that bill clients according to working hours may want to review time entries by customer.
QuickBooks Online provides this option to help you understand how much time your team spends working on different customer projects.
Follow these steps:
- Navigate to Time Entries.
- Select Customer from the Display By dropdown.
- Choose your preferred date range.
- Review the list of customers and their recorded hours.
- Select a customer to see the associated individual time entries.
This makes it easier to review project hours, monitor billable work, and understand how employee time is distributed across customers.
4. View Timesheets For All Employees
If you manage multiple employees, reviewing everyone’s working hours individually can take considerable time.
Instead, you can use the team member view.
- Open Time Entries.
- Select All Team Members from the Display By dropdown.
- Choose the date range you want to review.
- Browse the list of team members.
- Select an individual employee’s row to see detailed time entries.
Depending on your account, you may also find separate views for employees and contractors.
This feature helps managers review team activity and identify missing or incomplete time records.
5. Check Individual Timesheet Details
Sometimes, a total number of hours is not enough. You may need to check when an employee started working, which customer they worked for, or whether their recorded hours were approved.
To inspect an individual timesheet:
- Go to Time Entries.
- Select the appropriate date range.
- Find the employee or contractor.
- Select the individual timesheet record.
You can review information such as recorded hours, customers, services, billable status, and approval status when available.
Approved timesheets open in view mode, while unapproved records can open in edit mode.
You can also use the Actions dropdown to access timesheet history and review previous changes.
6. Customize Your Timesheet Display
QuickBooks Online allows you to customize the information displayed in your timesheet table.
To change the display:
- Open Time Entries.
- Select the settings or gear icon.
- Choose Show Columns.
- Select the information you want to display.
- Hide columns that are not relevant to your work.
Depending on your account, available columns may include employee names, hours, customer details, services, locations, billable rates, and approval status.
You can also choose how working hours appear, such as 1h 30 mins, 1:30, or 1.50.
A customized view makes it easier to focus on the information that matters most to your business.
7. Review Timesheet History And Changes
Checking timesheet history is important when you need to understand why an employee’s recorded hours have changed.
QuickBooks Online provides a history option for reviewing actions associated with individual timesheets.
To access it:
- Open Time Entries.
- Find the relevant timesheet.
- Select the dropdown under the Actions column.
- Choose View Timesheet History.
- Review the available activity records.
The history can show actions such as clock-ins, clock-outs, customer changes, and edits.
This is especially useful for resolving discrepancies before approving working hours or processing payroll.

Common Problems When Viewing Timesheets
If your timesheets are not appearing, consider these possible reasons:
- Incorrect date range: The selected period may not include the recorded hours.
- Limited permissions: Your account may not have access to employee time records.
- Time tracking is not configured: Your company may need to complete its time-tracking setup.
- Missing employee records: The employee may not have entered or submitted their time.
- Subscription limitations: Some time-tracking features depend on your QuickBooks plan and connected services.
Reviewing these settings can help you identify why certain timesheets are unavailable.
Final Thoughts
Learning how to view timesheets in QuickBooks Online can save time and make employee hour management more organized. By using the Date, Customer, and All Team Members views, you can quickly find the information you need. You can also review individual records, customize displayed columns, and check timesheet history before approving working hours. Make it a regular habit to review timesheets before payroll processing to reduce errors and keep your business records accurate.
Frequently Asked Questions
Where Are Timesheets Located In QuickBooks Online?
Go to All Apps, select Time, and then choose Time Entries.
Can I View Employee Timesheets By Week?
Yes. Select Date under Display By and choose your preferred weekly date range.
Can I View Timesheets For A Specific Employee?
Yes. Use the Team Member search or select an employee from the All Team Members view.
Can I See Who Edited A Timesheet?
Yes. Open the timesheet’s Actions dropdown and select View Timesheet History.
Can I View Timesheets By Customer?
Yes. Select Customer from the Display By dropdown to review recorded hours for individual customers.
Why Can’t I See Timesheets In QuickBooks Online?
Your user permissions, subscription, date filters, or time-tracking configuration may prevent you from accessing certain timesheet records.